This page explains redirecting DNS to internal when clients are on the same LAN as the MyWorkDrive server.
Connecting Directly to a Local Share While in the Office
In a situation in which your MyWorkDrive environment is on-premises, and your users are on site, and you are using a direct connection or local proxy (ie, not using SSL offloading to a cloud proxy like Azure Application Gateway or Cloud Web Connector), you have the option of allowing access to your file shares either directly via SMB or via MyWorkDrive. As the administrator, you may wish to optimize file access performance and eliminate the use of internet routing for your on-premises users accessing your file shares.
There are two options to connect to a local share while being in the office:
- Internal DNS with MyWorkDrive
- Directly via SMB
Using internal DNS, there is no concern about Internal DNS / split DNS for users who are remote (offices or at home) or when your infrastructure is hosted externally.
Internal DNS with MyWorkDrive
The benefits of continuing to use MyWorkDrive using internal DNS are:
- Improved performance when using the MyWorkDrive client while in the office
- One-time setup, no additional management
- No need to train users or remind them of an alternate login method/access
- Retain all the security features within MyWorkDrive
The disadvantage is that a direct SMB connection will typically be slightly faster.
Follow these steps to create an internal DNS entry using a DNS forwarding rule:
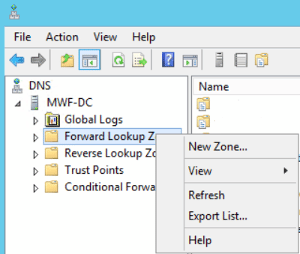
- Log into your DNS Server (we assume that will also be your DC) and open DNS Manager.
- Expand your DNS Server name, right-click on Forward Lookup Zones, and select New Zone.
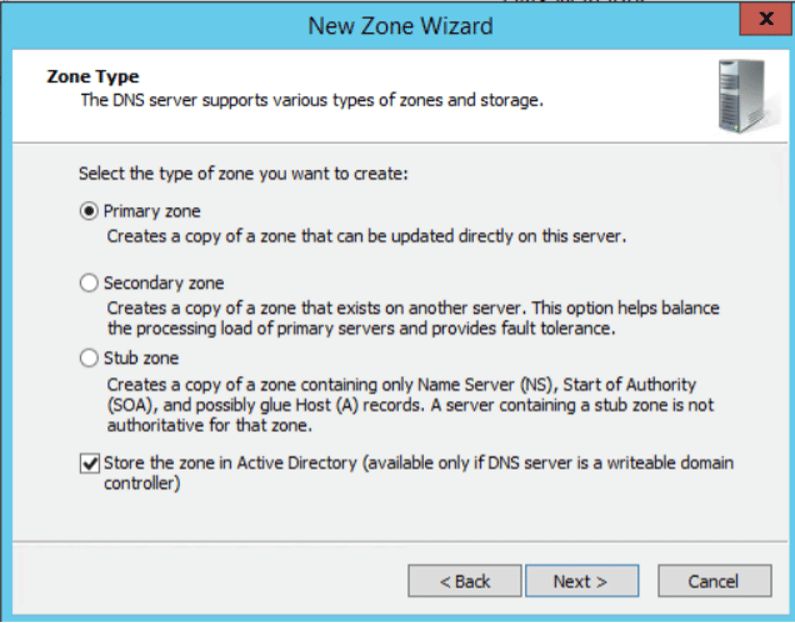
- Select Next on the welcome page, select Primary Zone, and decide if you want to store the zone in AD (the last checkbox). Select Next.
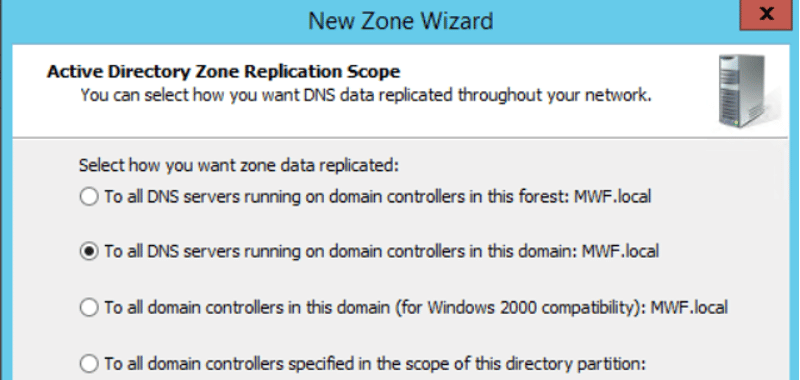
- Decide which DNS servers you want this zone to be created on. Select Next.
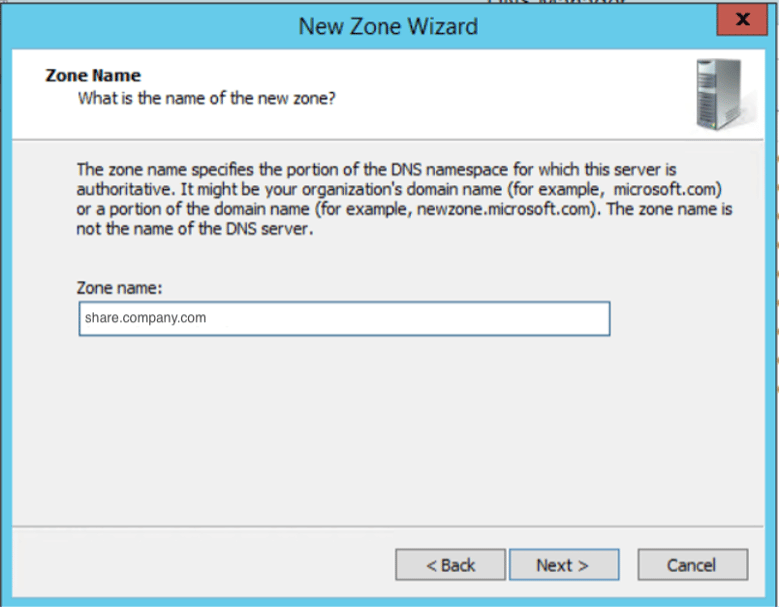
- Enter the name of your MyWorkDrive Server URL. Select Next.
- Select Do not allow dynamic updates. Select Next.

- Select Finish to close the zone wizard.
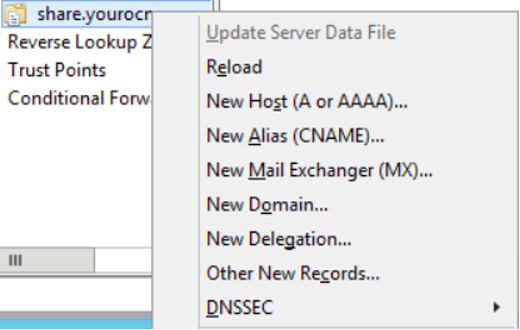
- Expand Forward Lookup Zones, browse to the new zone we just created, right-click on the zone, and select New Host (A) record.
- Enter in the IP address of the MyWorkDrive server and select Add Host.

Note: this will not affect name resolution for any other resource beneath company.com, as the system only claims authority for share.company.com.
Connecting directly via SMB
Connecting directly via SMB while in the office may provide the fastest access to the user’s shares, but requires the user to log off of the MyWorkDrive client and connect to the file shares.
If the users are accustomed to using mapped drive letters, they may need assistance in manually mapping drives or logging off and back on again to run login scripts. These processes can be simplified by using a script on the user’s machine or a “batch file.” They will need to be trained to run this when they arrive in the office.
The benefit of running a batch script is that the shares created are true SMB shares and will be the highest performing option.
The disadvantages include:
- Requires user interaction
- Must be deployed to user machines
- May require ongoing maintenance
Note: there could also be antivirus or security considerations in running a batch script.
We’ve demonstrated a batch script that the user will double-click anytime they are in the office. This script will log the user out of any open sessions of MyWorkDrive, and either use a group policy update or run a “net use” command to map the drive(s) over SMB. The choice of “net use” or “gpupdate” will be dependent on your environment.
Here is an example batch file:
:: Close the MyWorkDrive Windows Desktop Client then perform a group policy update or net use to map a drive directly.

:: navigate to the default MyWorkDrive directory then close the Mapped Drive client
cd "C:\Program Files (x86)\Wanpath\MyWorkDrive-Client-Windows\MyWorkDrive.Client.Windows.Desktop"
start MappedDrive.Client.Windows.Desktop.exe -x
::use timeout to ensure logout completes before continuing
timeout /t 10 /nobreak

::execute group policy update
gpupdate /force
::execute net use
::net use z:\ \\fileserver\fileshare

::quit when process completes
Exit
When the user is working outside the office, they can just double-click the MyWorkDrive icon on their desktop to run the application and log in.
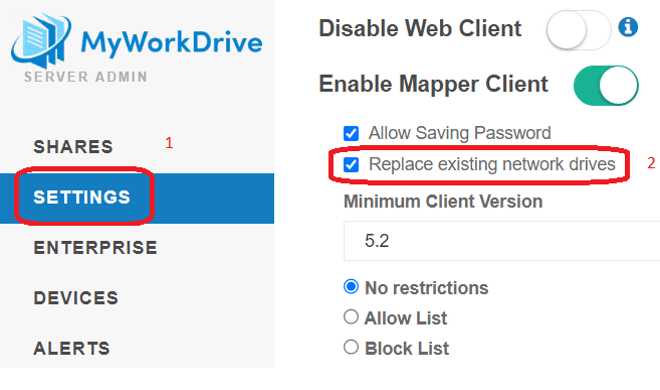
If the Replace existing network drives option is enabled under Enable Mapper Client Options in the MyWorkDrive Admin Panel (on the MyWorkDrive server), logging into the MyWorkDrive client will automatically disconnect any existing mapped drives and replace them with MyWorkDrive mappings. This ensures users have a consistent drive letter experience across all locations.